
Prep your grill and tools
A clean grill is the foundation of perfect steaks, burgers, and chicken. Brush away old char and debris from the grates while the grill is still warm, or use a damp cloth if it’s cold. This prevents flavor transfer and stops food from sticking to rusty patches.
Check your fuel supply. For charcoal, ensure you have enough lump or briquettes to maintain steady heat for the duration of your cook, plus a buffer for flare-ups. If using gas, verify the propane tank is at least half full. Low pressure leads to uneven heating and longer cook times, which dries out meat.
Gather essential tools: long-handled tongs for flipping without piercing, a sturdy spatula for sliding burgers off the grate, and a meat thermometer. Keep a spray bottle of water nearby to tame unexpected flare-ups without extinguishing the heat.
Grill filet mignon to perfection
Filet mignon is the most tender cut on the cow, but its lack of fat means it lacks the forgiving buffer of a ribeye or strip. A thin, lean cut can turn from juicy to dry in minutes if you lose control of the heat. The goal is a deep, mahogany crust that seals in moisture, followed by a gentle finish that brings the center to exactly 130°F (54°C) for medium-rare.
We treat the grill like an oven with a broiler on top. We use two zones: direct high heat for the sear and indirect medium heat for the slow cook. This method prevents the exterior from burning before the interior reaches temperature. Follow this sequence to ensure every bite is tender and evenly cooked.
Take the filet mignon out of the refrigerator 45 minutes before cooking. Cold meat hitting a hot grill creates a thermal shock that leads to uneven cooking. Pat the surface completely dry with paper towels. Moisture is the enemy of the sear; if the steak is wet, it will steam instead of brown. Season generously with kosher salt and coarse black pepper just before it hits the grate.
For a charcoal grill, pile the coals on one side to create a hot zone reaching 500°F (260°C). Leave the other side empty for indirect heat. For gas, light only the burners on one side. Close the lid and let the grill preheat for 15 minutes. You want the direct zone blistering hot and the indirect zone holding steady at 350°F (175°C). This setup gives you the power to sear and the space to finish without flare-ups.
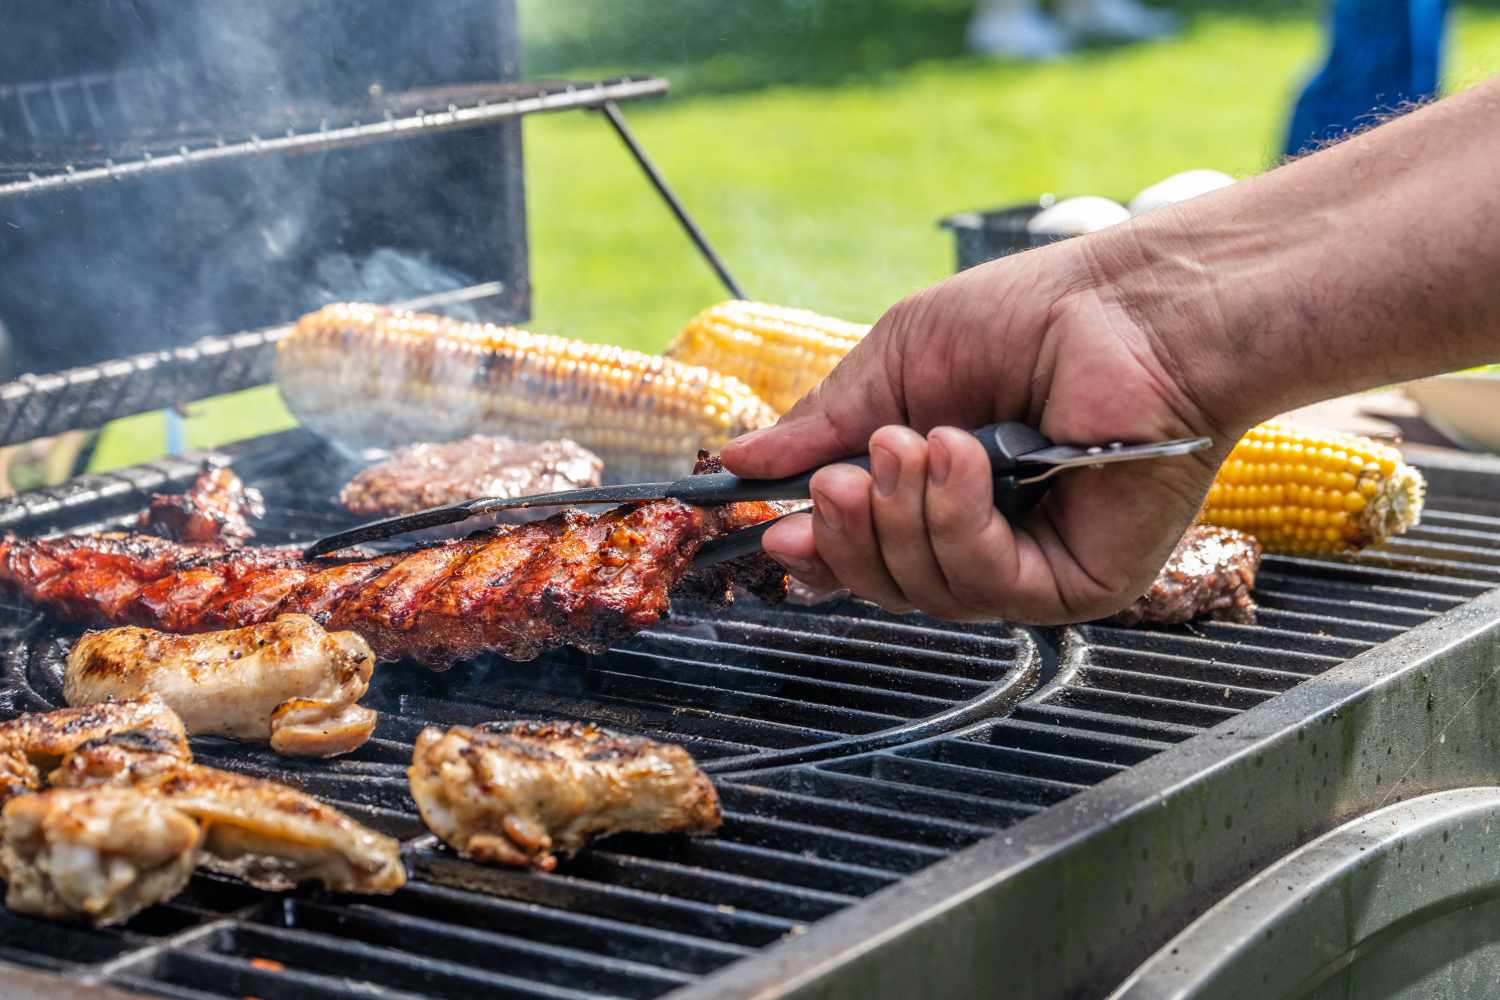
Place the steak on the direct heat grate. Sear for 2 minutes without moving it to develop a crust. Flip and sear the other side for 2 minutes. Then, use tongs to hold the steak vertically against the grates to sear the fat cap on the edges. This step renders the small amount of fat around the perimeter and creates a 360-degree crust. Move the steak to the indirect zone immediately after searing all sides.
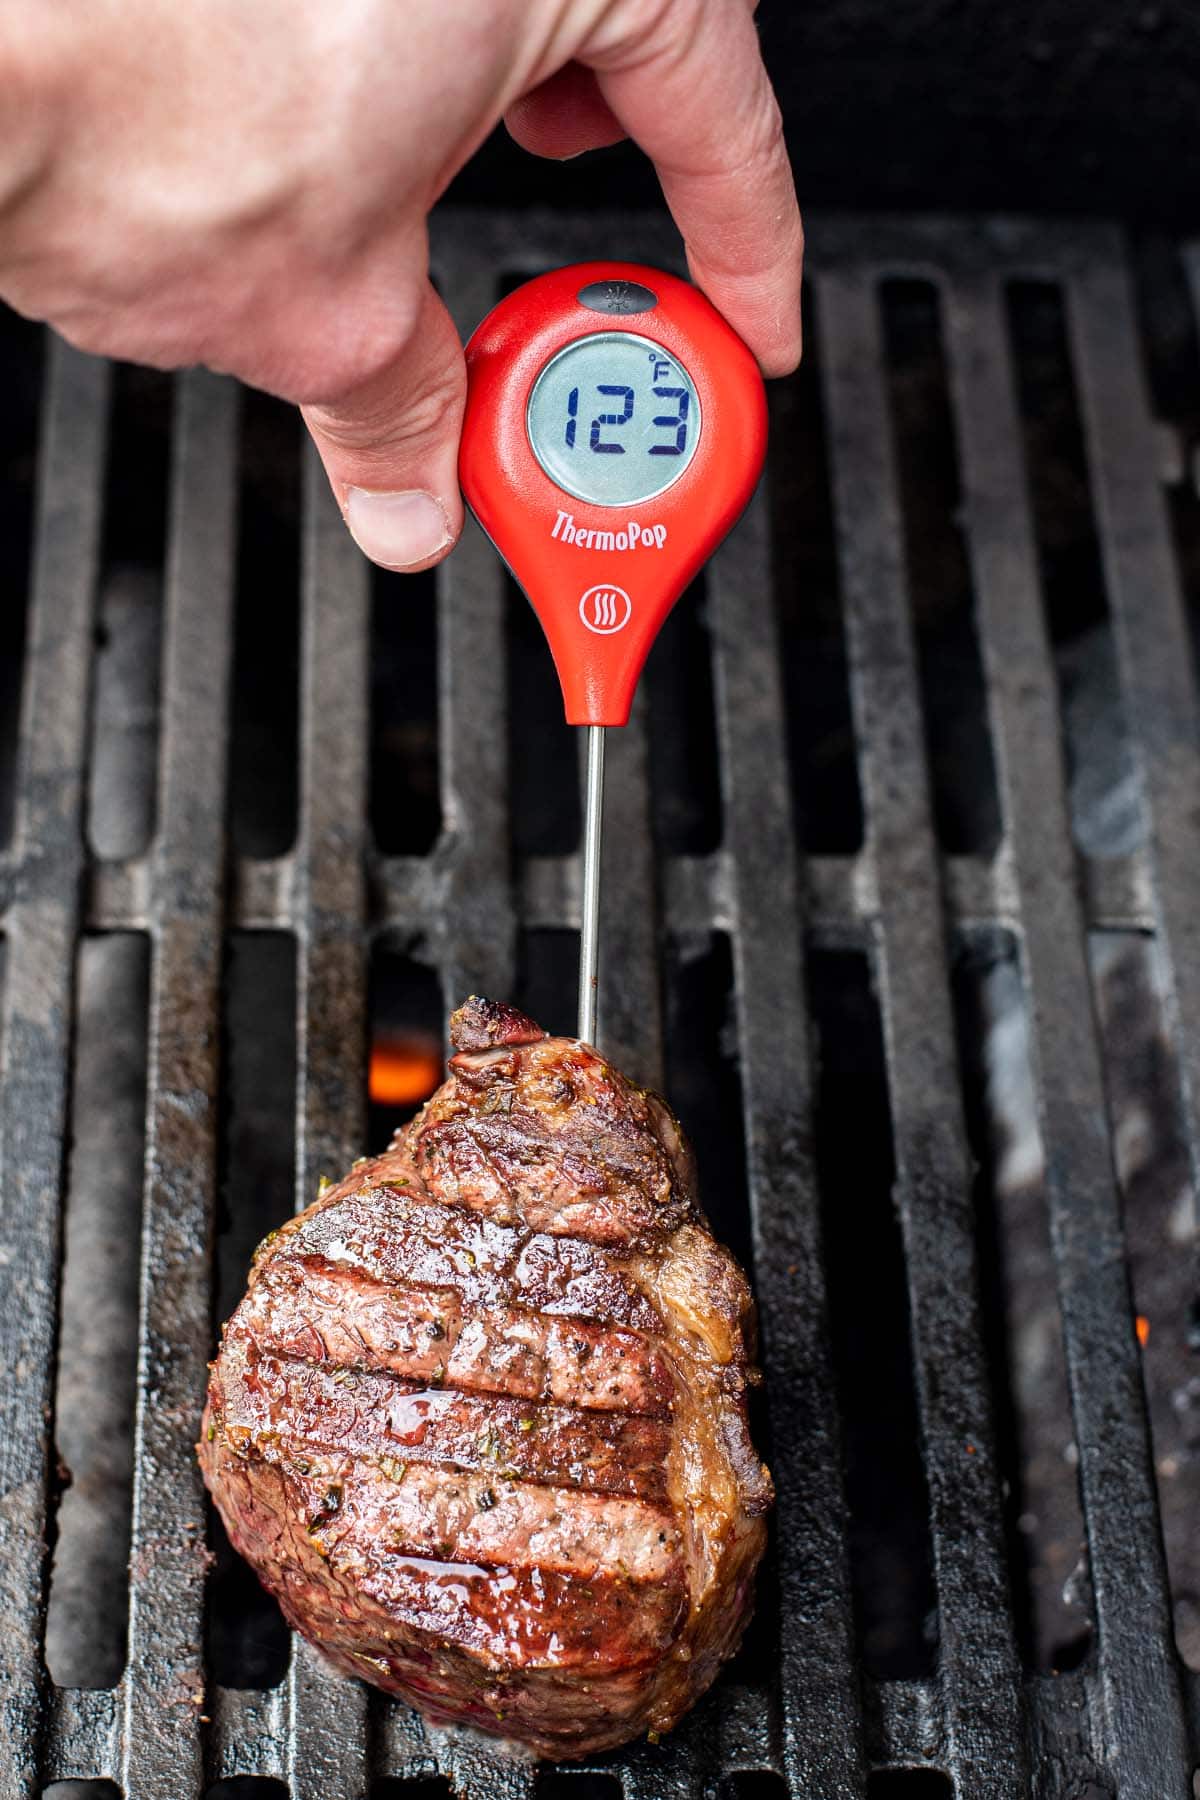
Close the lid and let the steak cook gently over the indirect heat. This is where the internal temperature rises. Check the steak every 3-4 minutes with an instant-read thermometer. Because filet mignon is often 1.5 to 2 inches thick, this phase takes about 10 to 15 minutes. Pull the steak when the internal temperature hits 125°F (52°C). The residual heat will continue to rise while it rests.
Transfer the steak to a warm plate or cutting board and tent loosely with foil. Let it rest for 5 to 10 minutes. This allows the muscle fibers to relax and reabsorb the juices. If you cut into it immediately, the juices will run out onto the board, leaving the meat dry. Slice against the grain and serve.
Cook juicy burgers without drying out
Ground meat behaves differently than a whole muscle steak. Because the proteins are broken down and mixed, heat penetrates faster and fat renders out quickly. If you treat a burger like a steak, you’ll end up with a dry, dense puck. The goal is to keep the interior tender while building a crust.
Chill your ground beef, bowl, and hands before mixing. Warm fat smears rather than staying in discrete particles, which blocks air pockets and creates a rubbery texture. Handle the meat as little as possible—just enough to form the patties. Overworking the meat develops gluten-like toughness in the protein matrix.
Gently shape the meat into discs slightly wider than your bun. Press a shallow thumbprint into the center of each patty. As the burger heats, the fat melts and the meat contracts, causing the center to puff up. The indent counteracts this shrinkage, keeping the patty flat and even rather than turning it into a meatball.
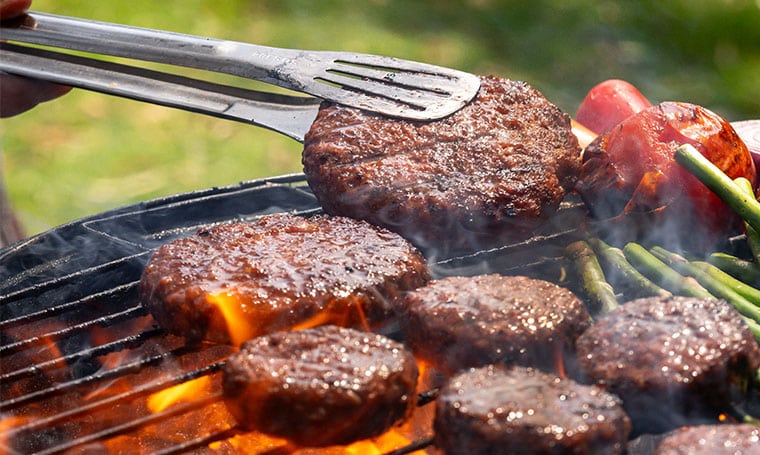
Place the burgers on a screaming hot grill grate. Do not press down on them with a spatula—this squeezes out the juices you are trying to keep. Let the fat render and the crust form undisturbed for 3-4 minutes. Flip once, then move to a cooler part of the grill or lower the heat to finish cooking through without burning the exterior.
Remove the burgers when they are 5°F below your target internal temperature (160°F for well-done ground beef). Let them rest on a plate for three minutes. This allows the juices to redistribute throughout the patty instead of running out onto the plate when you bite in.
Roast a whole chicken on the grill
Grilling a whole chicken is the ultimate test of grill management. It requires patience, precise heat zoning, and a willingness to let the bird cook slowly without burning the skin. Unlike a steak that sears in minutes, a whole bird needs time for heat to penetrate the thickest part of the thigh without drying out the breast. This method turns your grill into a convection oven, delivering juicy meat and skin that shatters like glass.
The secret lies in indirect heat. You are not searing the chicken; you are roasting it. By placing the bird away from the direct flame, you allow the internal temperature to rise gradually. This gentle approach prevents the skin from charring before the meat is safe to eat. It also allows the collagen in the legs and thighs to break down, resulting in tender, pull-apart texture.
Prep the bird for even cooking
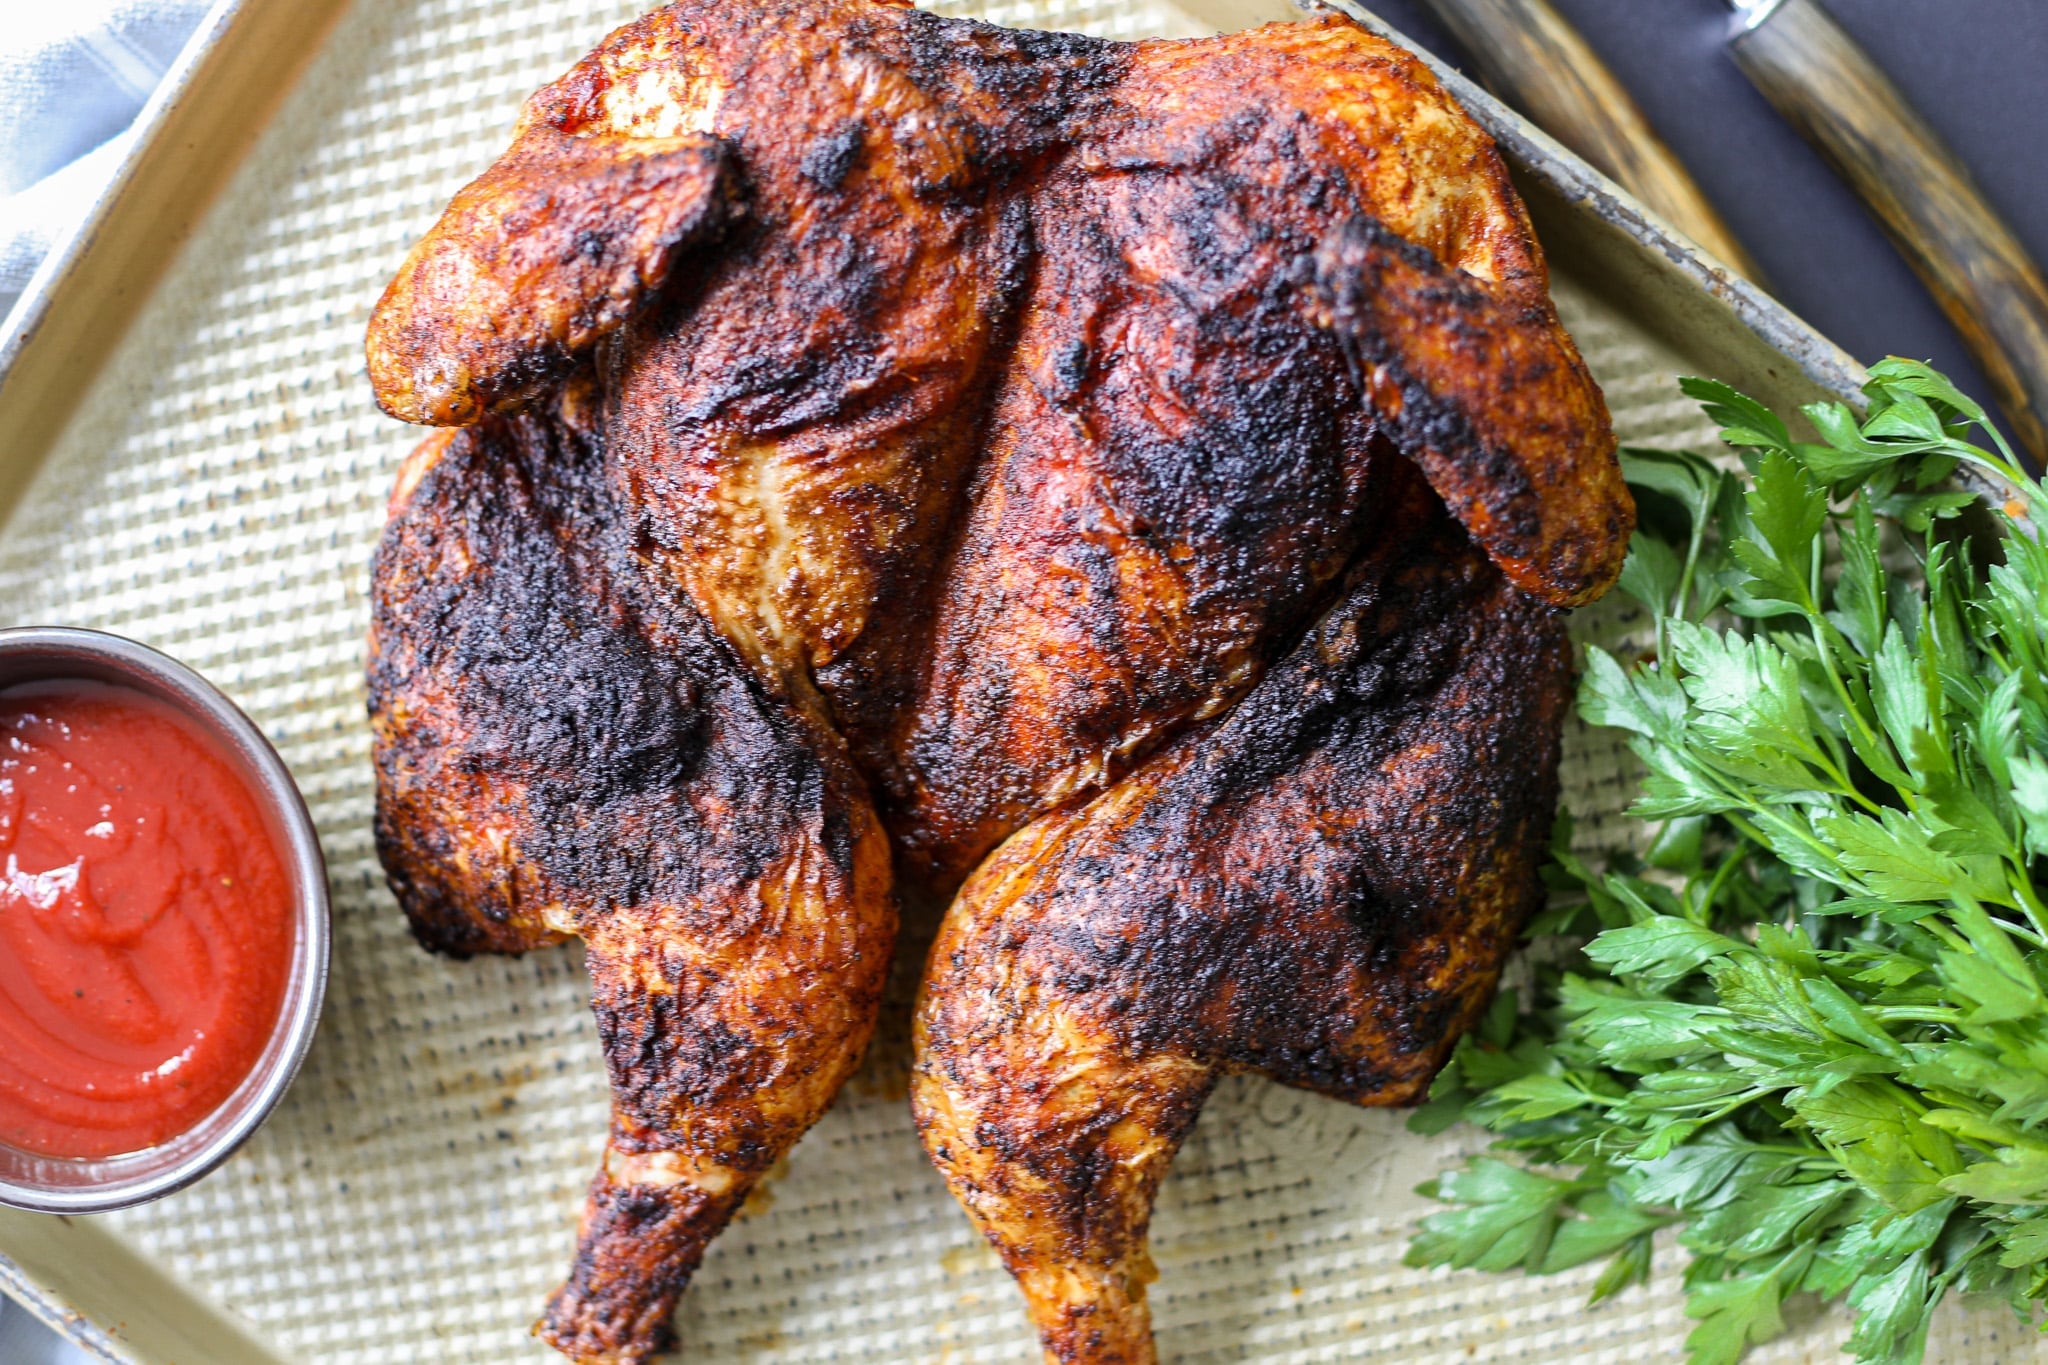
Start by ensuring your chicken is dry. Pat the skin thoroughly with paper towels. Moisture is the enemy of crisp skin. If the bird is wet, the steam will soften the skin rather than crisping it. Season generously with salt, pepper, and your preferred herbs. For extra flavor, tuck garlic cloves, lemon halves, and fresh thyme into the cavity. These aromatics steam from the inside, infusing the meat as it cooks.
For the most even cooking, consider spatchcocking the bird. This involves removing the backbone and flattening the chicken. A flat bird presents more skin surface area to the heat and ensures the breast and thighs cook at roughly the same rate. If you prefer a traditional roast shape, tie the legs together and tuck the wings under to protect them from burning. Either method works, but spatchcocking reduces cook time and guarantees uniform doneness.
Set up two-zone indirect heat
Your grill must have a hot side and a cool side. For charcoal grills, pile the lit coals on one half of the grill, leaving the other half empty. For gas grills, light only the burners on one side. Leave the center or the opposite side unlit. This creates an indirect heat zone where the chicken will sit. The direct heat zone is reserved for searing later, if needed, or for quick-cooking vegetables.
Place a drip pan in the empty zone to catch falling fat. This prevents flare-ups that can char the skin and create bitter flavors. The drip pan also helps stabilize the temperature by catching drippings before they hit the heat source. If you are using charcoal, add unlit coals to the pile to maintain a steady burn for the duration of the cook. You want a consistent temperature between 350°F and 375°F (175°C-190°C).
Position the chicken breast-side up on the cool side of the grill, directly over the drip pan. Ensure it is centered between the grate supports to prevent it from tipping. Close the lid immediately. The grill lid acts as an oven door, trapping heat and smoke around the bird. Do not open the lid for the first 30 minutes. Every time you lift the lid, you lose heat and extend the cook time.
Check the grill temperature every 15 minutes. Adjust the vents on a charcoal grill or the knobs on a gas grill to maintain the target range. Rotate the chicken 180 degrees halfway through the cook to ensure even browning. If the skin is browning too quickly, move the bird slightly further away from the heat source. If it is pale, move it closer to the edge of the indirect zone.
Insert an instant-read thermometer into the thickest part of the thigh, avoiding the bone. The chicken is done when the thigh reads 165°F (74°C). The breast should read 155°F-160°F (68°C-71°C). Carryover cooking will raise the temperature by 5-10 degrees after removal. If the breast is done but the thigh is not, cover the breast with foil to slow its cooking while the thigh finishes.
Remove the chicken from the grill and transfer it to a cutting board. Tent it loosely with foil and let it rest for 10-15 minutes. This allows the juices to redistribute throughout the meat. If you carve immediately, the juices will run out, leaving the meat dry. Resting is non-negotiable for a juicy roast. Carve against the grain for the most tender bites.
Avoid common pitfalls
The biggest mistake is opening the lid too often. Curiosity kills crisp skin. Each time you lift the lid, the temperature drops, and the cook time extends. Trust your thermometer. Another common error is using high heat. High heat sears the outside while leaving the inside raw. Low and slow is the only way to cook a whole bird on a grill.
Also, avoid stuffing the cavity with dense ingredients like raw potatoes or thick carrots. They take too long to cook and may not reach a safe temperature before the chicken is done. If you want vegetables, place them in the drip pan or on a separate grill grate. This ensures they cook safely and don’t interfere with the chicken’s internal temperature.
Final checks and serving
Before serving, verify the temperature one last time. The juices should run clear, not pink. If the skin is not as crisp as you like, you can move the chicken to the direct heat zone for 1-2 minutes per side. Watch closely to avoid burning. Once satisfied, carve the bird and serve with your favorite sides. The meat should be tender, the skin crackling, and the flavor deeply smoky.
Grilling checklist for success
Use this quick checklist to keep your steak, burgers, and chicken on track from prep to plate. Treat it like a pre-flight routine: a few minutes of attention now prevents burnt edges or dry meat later.
- Bring meat to room temperature: Let steaks, burgers, and chicken rest on the counter for 30 minutes before grilling. This reduces the temperature shock that causes uneven cooking.
- Preheat and clean: Light the grill 15 minutes before cooking. Brush the grates clean and oil them lightly to prevent sticking.
- Pat meat dry: Use paper towels to remove surface moisture from steaks and chicken. Dry surfaces sear faster and develop better crust.
- Season simply: Apply salt and pepper just before placing meat on the grill. Avoid wet marinades on high-heat zones unless you are searing quickly.
- Use a thermometer: Check internal temperatures early. Steaks reach medium-rare at 130°F, burgers at 160°F, and chicken at 165°F.
- Rest before cutting: Remove meat from the grill and let it rest for 5–10 minutes. This keeps juices inside for a tender bite.
Common grilling questions answered
Grilling times shift based on thickness, heat intensity, and grill type. Use these answers to troubleshoot the most frequent mistakes when cooking steaks, burgers, and chicken.
No comments yet. Be the first to share your thoughts!